Blazor Dynamic Linked Dropdown Controls
I recently came across a unique use case:
Our marketing department wants to be able to send out email promotions to users. That is simple enough.
Additionally, they want to be able to select the recipients by some or all of the following:
2. Name
3. City
4. Zip Code
In addition, they want to be able to select all matching users of a city or zip code or just the Point of Contact (POC) for the account.
The last requirement is that if Name is selected with POC no other users can be selected and vice versa. If the POC is not selected, the user can add names.
Backend Design
The backend system design is simple, get a list of users and send each one an email. If the user chooses city or zip code and POC, we will need to filter by those variables. We will not cover that code in this post.
I want to focus on the UI for this solution.
Possible UIs
There are many ways we could go with the UI. Ranging from a radio button group for name, city, or zip code. Then a check box for POC or not. But then we would need a separate UI for names.
We could do the left/right data list selection boxes where you move a name from the left to the right to add them or right to left to remove them.
Or we could use a dropdown list instead of the list boxes.
With this UI, you still must have checkboxes for POC and
“ALL”. But for Users, you could disable
the list boxes if POC is checked.
From a UX point of view, you are looking at multiple clicks
to add and remove selections from the list boxes. I was aiming for a better experience.
Chosen UI
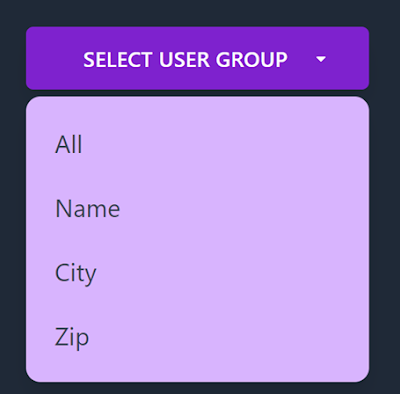
I decided to go with a single dropdown, that holds All, Users, City, and Zip.
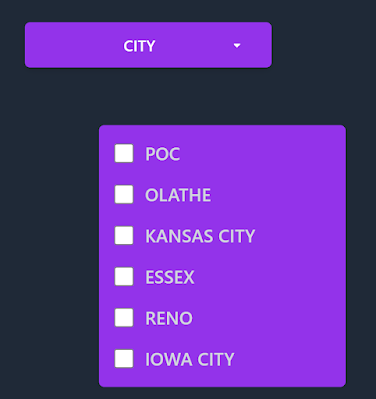
Then based on the selection of the dropdown, I populate the list
box with the items that the user can select from.
When the user selects “ALL” we will not show the list box
choices.
When the user selects either “City” or “Zip” and “POC”, they
would still need to select at least 1 city or 1 zip code. This selection will result in the POCs for
the accounts that are in those cities or Zip codes. If POC is not selected, all users in the
selected city and zip code will receive the email.
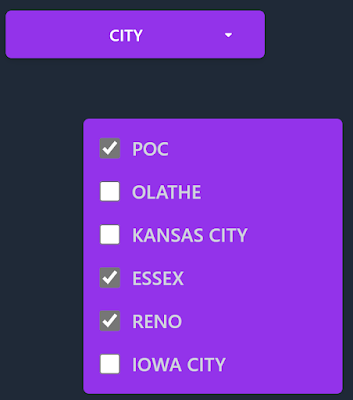
For this example:
Only these POCs in Essex and Reno will be sent the promotional
emails.
Name Selection
We have the All, City, Zip, and POC handled with the UI, now let’s see how we can handle that.
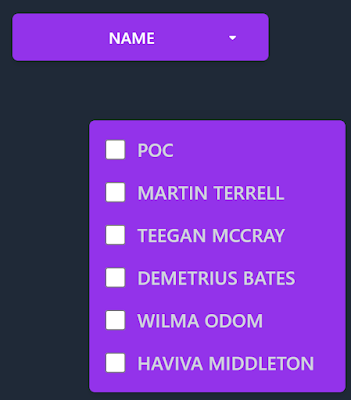
When the user selects “Name”, we automatically turn on the user-selected POC flag. In the razor page, we set up a condition to just display a POC check box when the flag is set:
{
<li>
<div class="flex items-center">
<input id="checkbox-item-1" type="checkbox" checked=userNamePOCOnly @onchange='eventArgs => { CheckboxClicked("POC", eventArgs.Value); }' >
<label for="checkbox-item-1" >POC</label>
</div>
</li>
}
else
{
@foreach (var item in DisplayItems)
{
var text = item;
bool isChecked = selectedItems.Contains(text);
<li>
<div class="flex items-center">
<input id="checkbox-item-1" type="checkbox" checked=@isChecked @onchange="eventArgs => { CheckboxClicked(text, eventArgs.Value); }" >
<label for="checkbox-item-1" >@item</label>
</div>
</li>
}
}
When the user turns the flag off, we display the list of names and a POC item at the top in the second half of the list.
If the user selects POC again from the list, we set the flag and clear out any selected users. This resets the process back to how it was displayed originally.
Name and POC
Name with full list
Dynamic Linking Dropdown to list
Hopefully, you have noticed that when changing the drop-down
between possible values the list box changes the possible items to choose from.
We have attached an event handler on the drop-down control
to the on-click event, which is just a button.
Once it fires, we update the collection we are using for the list items,
“DisplayItems”. This allows us to use
only a single collection of data bound to the list box. We have separate
collections for Users, Cities, and Zip codes.
We use these collections to populate the display items. You must clear out the old display items
before using the AddRange function to populate the display items collection or
you will end up with multiple items in the list that get displayed.
Summary
I like the solution I have for this problem. It was a fun problem to solve. It did take several iterations to get to the
final solution, but from a UX perspective, I believe it makes a complex issue
simple for the user. While keeping the user clicks to a minimum.
I have not turned this into a reusable control because I am
just not sure how often it would be used.
If I find another use case for it, I will most likely turn it into
a component.





%20built%20with%20Blazor.%20The%20scene%20features%20a%20dynamic%20web%20app%20running%20o.webp)
Comments
Post a Comment